Thursday, October 30, 2008

Gundam Fix Metal MRX-010 PSYCO GUNDAM Mk-II #1003 1/144 Scale

It's BIG! It is freaking HUGE. It's purple, and it's evil. That's my first impression!


This version of the Psyco Gundam MK II comes with a stand (shown in the below pictures) for Gundam mode, and Mobile Fortress mode. This fix is way bigger in real life than you can see in the pictures. It is around 300mm tall. It's the tallest Fix out there in the wild!

It's even bigger and taller than the Gundam FIX 1002 Psyco Gundam Metal Composite Fix!

Now let's dive down to the details. B0y, this Fix is perfectly painted, the paint job is as perfect as all the other 100X series. Not a single flaw on the paint job! However, the head. Hmm.... the head is a bit inproportional compare to the rest of the body. I wish they can make the head a bit bigger. Also, the legs are way too log for the body too, or the body is too short for the Gundam. To see that in perspective, MK II is taller than the MK I, but the head is smaller, and the body is shorter. It is just not quite working for me.


The Gundam is made of the hard plastic and metal. However, The only metal parts are the joints. The actual metal part is in the ass, the leg joints, and internal leg frame. You can see that from the below pictures.


The "mobile fortress" mode:

When the Gundam in this mode, it looks awesome! It looks as good as it can be!


Posting!

One word! Hard! This fix is hard to post! The legs are too long. There is a tendency for all transformable Fixes that they look out of proportion when they are in the Gundam form, and their parts are falling apart. Good examples are the Gundam Fix 0024 Z Gundam, and the Gundam Fix 0016 Z plus. The below picture is the best I can post this Gundam. Don't get me wrong, when the Gundam is in the mobile fortress mode, it looks awesome. It looks some what funky when it is in Gundam mode.


Value:

It's huge and with the excellent paint job. I think it worth getting it if you can get it under 100 US dollars including shipping from ebay.

History:

Roughly halfway through Mobile Suit Gundam ZZ, the mostly-intact body of the Psyco Mark II was recovered by the Neo Zeon forces under Haman Khan. After being brought back online, the Mark II is delivered to Glemy Toto's detachment overseeing the colony drop operation on Dublin. Piloted by Puru Two (a clone of Elpeo Puru in Toto's service), the Mark II's full potential wreaks havoc on the AEUG forces attempting to evacuate Dublin. The goliath is heavily damaged during the drop itself, and destroyed for good by protagonist Judau Ashta'sZZ Gundam (unlike its previous operator, Puru Two makes good use of the detachable head and escapes).

Conclusion:

This Fix has some head, body, and legs proportional problems. However the paint job is perfectly done, and it's huge. It's not a must buy, but if you have extra money to spend, get it! I still recommend people to get this huge Gundam Fix!

more pictures can be found here http://ga.sbcr.jp/mgundam/010582/

Information courtesy of http://en.wikipedia.org/wiki/Psyco_GundamLocations of visitors to this page

Tuesday, October 28, 2008

Gundam Fix 0040 - final product pictures


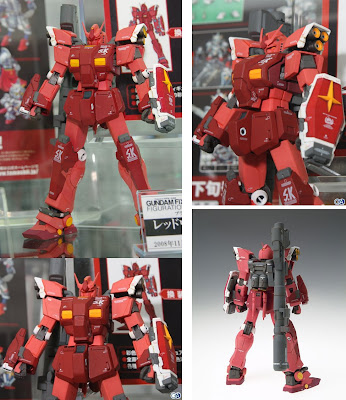
More pictures on the Gundam Fix 0040 Red Warrior. The face looks somewhat like the Z-Gundam, and the frame of this body is same as the Gundam Fix 0026 RX78-2 ver. ka.

Gundam Fix 1005 MSZ-006 Z plus - more info


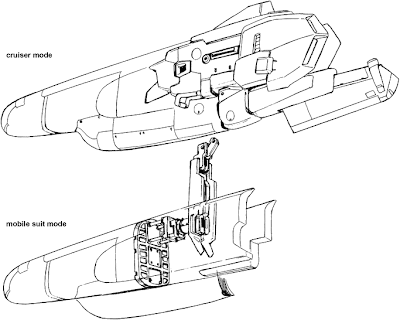
Check this out! It is the up coming Gundam Fix 1005. A 12 inches tall Z plus. This time you can really transform it without breaking it. The smaller Z plus (Gundam Fix 0017) is very easy to break, and it does not look good in it's Gundam Form. If you look at the picture closely, you can see that it has all the backpacks and armors when the gundam is in heavy armor form. I am looking forward to buying this one!Locations of visitors to this page

Saturday, October 25, 2008

More details about G.F.F #1004 RX-78-2 Gundam Ver. Ka - scan


This a scan from November release of Hobby Japan.

The new GFF #1004 is basically same as the #1001, without the G-armor. What's new in the box is that you will get a Gundam hammer, and the bean javelin. Also, it will come with the making of "Gundam Crisis".

Also, you will see some graphic differences. At the antenna, you will see a print of "Gundam". There are also another logo on the left shoulder.

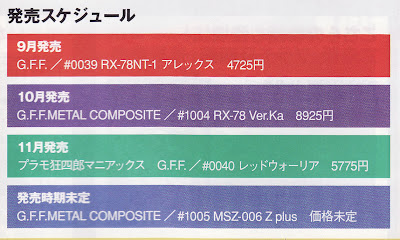
Up Coming G.F.F Release Schedule - Nov 08


Here is the up coming G.F.F release schedule. You can see that they are releasing 1004 in Oct. red devil Warrior (my misspell) is being released in Nov, and 1005 MSZ-006 Z plus (see below picture), the one that I am looking forward to buying still have no release schedule.


pictures source : en.wikipedia.org/wiki/MSZ-006_Zeta_Gundam

Dynasty Warriors Gundam 2 - more info

Dynasty Warriors Gundam 2 - Gundam Musou2 was announced in Tokyo Game Show 08, and here is the offical gundam musou site.


and you watch the official release video below!

Saturday, October 18, 2008

Monday, October 13, 2008

G.F.F. #0014 Transformation Project - Day 6 - Completion

Yesterday, we had the legs put onto the body. Today, we put the arms, and the backpack boosters back on. In the below pictures, you can see that two while joint that I built for the arms. They are four pieces of 1mm plastic sheets stack on each other. Then I cut out the shape, and used super glue to glue them together. Notice that I also drill a hole on the joint that I built to fit into the original shoulder joint that comes with the


A closer look to the G-crusier, you can see the shape of the joint.


The G-curiser with the original stand.


Different angle of the G-cruiser.


Ex-S Gundam and the G-crusier side by side! It's all done! I am going to start my next project! Tomorrow!

Sunday, October 12, 2008

Gundam Mini Figure Selection


I was shopping at Uwajimaya, Seattle on Saturday, and was looking for some magazines. Then I found these mini figures were on sale. I remember they used to be 24.99 dollars. For some reasons, they marked down the price to 4.99. Wow, I immediately got one and took it home! I am thinking now if I should just go get another one!


They are Char's Customized Selection. The below words are from the box. The chief pilot of ZEON, Char Aznable uses his personal MS's colored in red. He performs excellently regardless place, in the space, on the gound, or in the water, with his matchless sense in battling. char's sucessive wins, the EFSF members dread him calling in the name of "Red Comet". He goes giving full play to his ability as a NEW TYPE PILOT.

G.F.F. #0014 Transformation Project - Day 5

I actually have the G-cruiser done already. I am telling you that it probably takes more time to blog about it then actually work on it. Anyway, on day 6, the whole thing would be done. I will show you the finish pictures.

Below is the body that I put all the pieces from day 4 together.


Different angle of the body.


The body only on the rack!


Body with legs from above. You can see that I acutally almost used all pieces that I cut off from the body and put all of them back together here!


Body and the legs from behind!

Thursday, October 9, 2008

G.F.F. #0014 Transformation Project - Day 4 - legs & body

Now it comes to the legs and body today! The leg is relatively easy. You only need three cuts and you are done.


Then just glue them together like the below picture! Easy!


The body is crazy. First, it took me a while to understand the below picture. Then to decide where to the body apart. The two part took a while already.


Alright, the is the body before you cut it without the head, arms and legs.


I would suggest you to first cut off the back piece, which I think this is the easiest part in term of separating body parts.


Then, cut off the shoulder part near the neck.


This is the hardest part of all the cutting. You have to make sure you separate the red piece from the chest. You need to be extra careful about the cutting. First, you need to cut off the red part from the edge and make sure you don't cut the joint, the grey area. Then, separate the rest of the upper body from the lower body. They are actually two piece to begin with, but the cutter can't reach the area where they glue the two piece together. I used a screw driver to separate them. It require extra force, really. My suggest is to force in a philip screw drive, and turn clockwise for 90 degree. It might also damage part of the body. Make sure you don't damage the part where you can see. I will show you a picture tomorrow, and you can take note on what part of the body will be seen from the outside.


Below are the gundam's body in four pieces. Finally, I will show you the pictures that I put all body parts together in the next two days.

Wednesday, October 8, 2008

G.F.F. #0014 Transformation Project - Off Topic #2

Ahhhhh..... you can find so many interesting pictures from the internet. Thanks to the google image serach, I found some more crazy pictures of the Ex-S Gundam. The below pictures are a 1/35 Ex-S Gundam. That thing is as big as a 4 year old!!!!


G.F.F. #0014 Transformation Project - Day 3 - arms

Now, it comes to the 3rd day of the Project. It's actually the 4th day, but I wasn't doing anything yesterday. Anyway, I am working on the arm today. The below picture shows what it should look like when the shoulder, arm, the wing on the arm, the backpack on the arm are in the cruiser form, idealy.


The arm and shoulder are taken apart. They are glued so tight together that I spent so much time just to take the blue pieces off the shoulder. If you are going to do it, make sure you have a cutting mat, or you will need a new table after the project. Also, make sure to wear protective glove before you start. You might seriously injure yourself, if you don't!


As you can see, I use super glue to glue the piece together, and it works pretty well. The below picture shows a half done hand piece.


Right, the hand and shoulder in mobile suit form. On the left, the hand and shoulder in cruiser form.

Monday, October 6, 2008

G.F.F. #0014 Transformation Project - Day 2

Research, research, and research, and took it all apart! Now, I think I have enough information making it happen, transforming the Ex-S Gundam from Gundam form to G - Cruiser form.

I am doing this after work and during the weekend in a slow paste. The first day is all about research and taking the Ex-S Gundam apart. The pictures to the left is showing how a G-Cruiser should look like with the Gundam parts. Figuring out which part go where took a long time, but it took me even longer just to take the Gundam apart. It's not easy to do so because they glue the parts to damn tight together. I had to use so much force, and now my hand is hurting. I will go throught the details steps as I go through the rest of the days. My current plan is to work on the arms, legs, then to the body. By looking at the arms right now, it probably going to take me a long time to disassemble the Gundam's arms further. Will see how it goes later.

Sunday, October 5, 2008

G.F.F. #0014 Transformation Project - Off Topic

Ho Ho Ho! I found these pictures while I was looking for info on the Ex-S Gundam. They are so cool. According to the site, that guy spent five months on putting it together!!!